- HOME
- Building a business
- Best practices to follow when shooting your online course videos
Best practices to follow when shooting your online course videos
- Last Updated : December 13, 2023
- 808 Views
- 8 Min Read
If you're creating online courses, it's crucial to learn the basics of video production. When you focus and invest effort in making professional-looking videos, people trust you more as a trainer and educator. If your videos are interesting to watch, your students will stay engaged and be motivated to learn more. It's like when you enjoy watching a movie—you give it your undivided attention.
Making good videos depicts your commitment to delivering quality educational materials. It fosters a sense of care amongst your students, and they’ll feel more confident about your course. So, paying attention to video quality isn't just about the videos themselves; it's about making the learning experience positive and helpful for everyone.
In this blog post, we’ll discuss how to choose the right kind of equipment, best practices to follow, and things to avoid when shooting your course videos.
Choose the best camera to record your course videos
A well-equipped camera ensures crisp and clean visuals, helping students learn and engage better. It’s a game-changer for course creators striving to provide the best possible learning experience. The key is to prioritize the camera's versatility, ensuring flexibility when recording different courses and subjects.
To make your camera selection process easier, ask yourself the following questions so you can make informed decisions.
1. What type of video are you planning to shoot?
If you’re going to record in a stationary environment without much movement, a regular camera is a suitable choice. For videos that are dynamic and require constant movement, you can opt for a camera that’s compact and easy to move around.
2. What’s your desired video quality: 4K or 1080p?
Decide if you require high-quality 4K footage, or if standard 1080p will be sufficient. The trick is to put yourself in the viewer's shoes. Will your students be watching your course videos in 4K? Decide if the video quality will significantly impact the learning experience.
3. What’s the maximum budget you're willing to allocate for the camera?
It's important not to overspend, so investing $15,000 on a state-of-the-camera for a course that's priced at $15 is not a great business decision. Calculate your expected return on investment before setting a budget so you can make wise financial decisions.
4. How comfortable are you handling a camera?
Many course creators tend to overlook this important aspect. Even if you buy a fancy camera, it won't help if you don't understand how to use it. So, if you're just starting out, it's better to pick a simpler camera.
Once you answer these questions, you'll have fewer options to choose from. Do some research online, including reading product reviews, so that you make the right choices.
Bonus tip
If you're just starting out as an online course creator and can’t afford to spend a lot on a camera, don't worry. The newest smartphones are capable of recording top-quality videos. It all depends on your preferences and business goals.
Selecting a camera tripod
After making your camera selection, the next essential piece of gear is a tripod. Tripods keep your videos steady, prevent video shakes and wobbles, and ensures visual consistency. There are many tripod options available for both smartphones and professional cameras. Opt for a robust tripod with various height settings. Table tripods are also excellent for live classes because they can support a camera positioned right above your computer screen.
How to position yourselves when shooting course videos
When you're shooting online courses, how you position yourself in the video really matters. It's like arranging everything in a way that keeps people interested in your course videos without getting distracted. So, as a course creator, you need to know the best ways to set up your video.
Pay attention to where you are in the video frame, the angle of the camera, and your surroundings. These things will make a big difference in how engaging and easy to follow your videos are. There are three simple rules to follow when composing a video.
1. Rule of thirds:
According to the rule of thirds, the subject—in this case, the speaker or instructor—should position themselves so that they occupy one-third of the frame. To do this, use the grid lines available in your camera. These lines, two vertical and two horizontal, create nine segments with four points of intersection each. Position yourself so that you’re in the center of the intersection of a vertical and a horizontal line. This not only adds balance to the frame, it also guides the viewer's focus to the central elements of your video.

2. Symmetry:
Symmetry is a famous composition technique that involves balancing the entire frame from a central axis. From the perspective of course creation, positioning yourself along this central axis allows for visual balance in the left and right panes of the frame. This technique adds clarity to your video and contributes to a distraction-free and aesthetically pleasing presentation.
3. Leading lines:
The leading lines composition is a technique used to guide the viewer's focus toward a specific subject within the frame. Create visual leading lines that naturally funnel towards the subject. This technique enhances the viewer's experience by directing attention where it matters most.
How to choose a background for your course videos
Your background choices can greatly impact your video quality and set the tone for your audience. Two important things that you need to keep in mind when it comes to video background is to be as minimal and distraction-free as possible. The background should compliment the video, not go overboard and distract your viewers.
Content creators usually prefer either solid color backgrounds or contextually designed backgrounds. Solid colored backgrounds are pretty straightforward—you can use a plain cloth or paper of any color that goes well with your videos and lighting.
There are numerous mountable roller walls available in different colors with a pull-and-release mechanism. This is a great piece of equipment for course creators to shoot clutter-free videos against, and they simply roll up after the shoot.
Bonus tip
Paper backdrops tend to create harsh light bounce. You can use vinyl backgrounds to spread lighting evenly and be more pleasant visually.
The next usual practice that most course creators follow is adding contextual elements in their video background. These can be elements that represent the content subject, or your brand logo or other element that compliments the video content.
How to set up lighting when shooting your online course videos
You might have the latest professional camera and a meticulously designed studio, but if the lighting isn't on point, your video might not end up looking the way you intended it to. Good lighting is key to making your videos look top-notch and engaging for your audience.
Why does lighting matter so much? It makes things visible, sets the mood, and creates a consistent, professional look. Think of it as the silent storyteller that enhances emotions and keeps everything visually appealing. When you're shooting videos, pay attention to where your lights are placed, how they shape the atmosphere, and make sure they stay consistent throughout.
Common types of lights used in video production
Key light: The key light serves as the primary source of light for the shoot, establishing the overall tone for the space. Its power, color, and position play critical roles in influencing video quality and enhancing subject depth and proportion.
Fill light: The fill light works in conjunction with the key light, complementing it to balance the overall light fill and illuminate the subject effectively.
Back light: The back light creates a subtle glow behind the subject, visually separating it from the background and contributing to the depth and overall ambiance of the video.
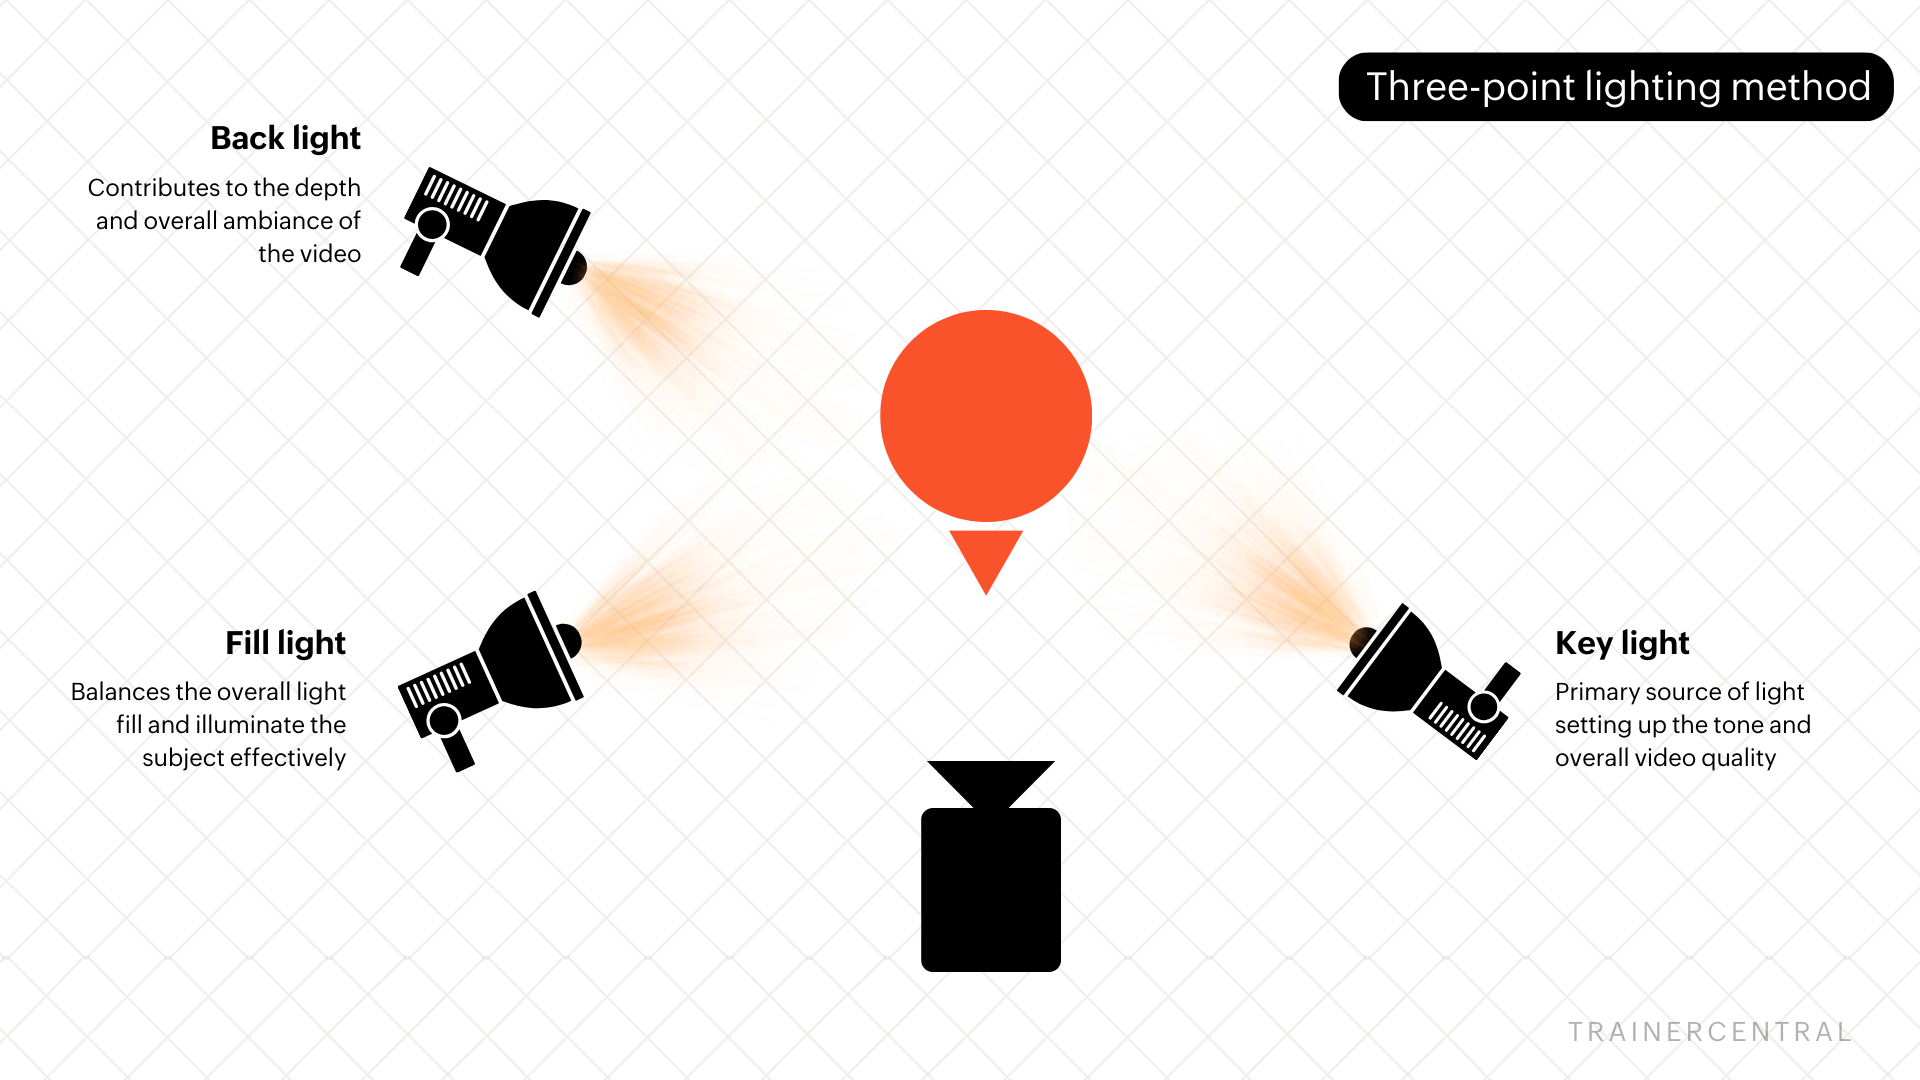
Understanding and skillfully using these types of lights are essential for creating well-lit and visually appealing videos. In addition to the lights, you also need to follow a few best practices to get the best video outcome.
The 45-degree rule
The most common mistake that content creators make is placing the light source exactly opposite to them. This results in harsh lighting and uneven shadows in the video. To overcome this, you can tilt the lighting source 45 degrees on both sides so that the light is spread evenly across the video frame, avoiding shadows. This simple adjustment in light angles can make a significant difference in the overall look and feel of your video.
Use a diffuser
Harsh lighting is usually tough to handle because it creates very sharp visuals with deep highlights, impacting the video quality. So, it's always better to use a diffuser setup to spread the light and make it as soft as possible. It acts as a medium to disperse the lighting to tackle the harsh light bounces and shadows.
Bonus tip
If you can’t afford a professional diffuser setup, don’t worry. You can use a thin fabric cloth as a diffuser to smooth out the light. You can place a piece of white fabric on top of your source light and adjust it to get the required outcome in tone.
How to record audio when shooting online course videos
A few things to keep in mind when recording audio for your courses are the sound echoes, recording device quality, audio clipping, and background noises. Hard surfaces in the room can bounce sound around and create unpleasant echoes. To overcome this, you can use acoustic pads on your walls and fill the room with soft materials, like pillows and carpets, because they can absorb sound and reduce echo.
The next important thing is choosing a suitable recording device. Built-in microphones in your camera and smartphones are good, but not great, especially for course videos. Invest in a good external microphone that meets your growing needs.
Condenser microphones are usually preferred because they can record audio cleanly and precisely. Some microphones are even smart enough to detect and nullify ambient noises. Do diligent research on microphones that meet your needs.
Microphone position is a key factor in making the audio recording seamless. Double check the distance between you and the microphone. It shouldn't be close enough to capture your breath sounds, and not so far away that your voice is lost. Keep testing until you figure out the right distance.
Background noise is another annoying factor when recording, and it’s tough to remove in post-shoot editing. The best practice is to choose a room that's free from all of the traffic rumble, and turn off fans or other ventilation systems to avoid those gushing wind sounds.
Avoid audio clipping
Audio clipping is a form of audio distortion when you go beyond a certain frequency while recording your audio. When you push the loudness of the audio beyond the threshold point, the recording device will start chipping the audio.
For example, let's say your recording meter range is -15db to -25db, but you talk too loud and go beyond the stipulated frequency. The audio notes that are outside the recording range get chopped. This makes the audio unpleasant and distorted.
You can avoid this by closely monitoring your audio recording thresholds. In your recording device, you can set the recording range as preferred and start recording within those specific limits. You can use the popping green bar as an indicator to monitor the clipping levels; if the bar hits red, then the audio starts clipping.
In simple terms, anything you say outside the threshold level, i.e., in the red bar region, will be chopped off. This is the reason for distortion and audio breakage. So don't be too loud or too feeble. Simply talk in a steady, even tone.

Final thoughts
Just like any other skill, video production requires practice and experience. This article is just an outline of the best practices to get you started on the path to mastering the skill of professional-looking videos. Keep these basics in mind, review your videos, and make upgrades as you populate your content.


